Wireless Keyboard Angles: Optimal Ergonomic Setup
By Elena Novák • 24th Apr

Wireless keyboard ergonomic geometry isn't a luxury, it is a precondition for sustainable typing across multiple devices and workstations. Whether you're switching between Linux terminals, macOS Xcode windows, or Windows development environments, wrist and shoulder strain can compound silently until flow becomes friction. This guide walks you through measuring, configuring, and validating the optimal typing angle for your wireless setup, with reproducible methods that work cross-platform.
Step 1: Establish Your Baseline Position
Before adjusting anything, document your current setup. This matters because ergonomic keyboard optimization requires a reference point.
Open a terminal, IDE, or text editor and type for five minutes at your normal speed. Pause and assess:
- Where does your wrist sit relative to your forearm? (Neutral, bent upward, bent downward?)
- What angle is your keyboard relative to the desk surface? (Flat, tilted forward, tilted back?)
- Are your shoulders relaxed or elevated?
- Do you feel tension in your forearms, wrists, or neck after 30 minutes of continuous typing?
Take a side-view photo of your hand and keyboard at rest. This becomes your baseline for comparison as you make adjustments.
Step 2: Understand Tenting and Tilt Angles
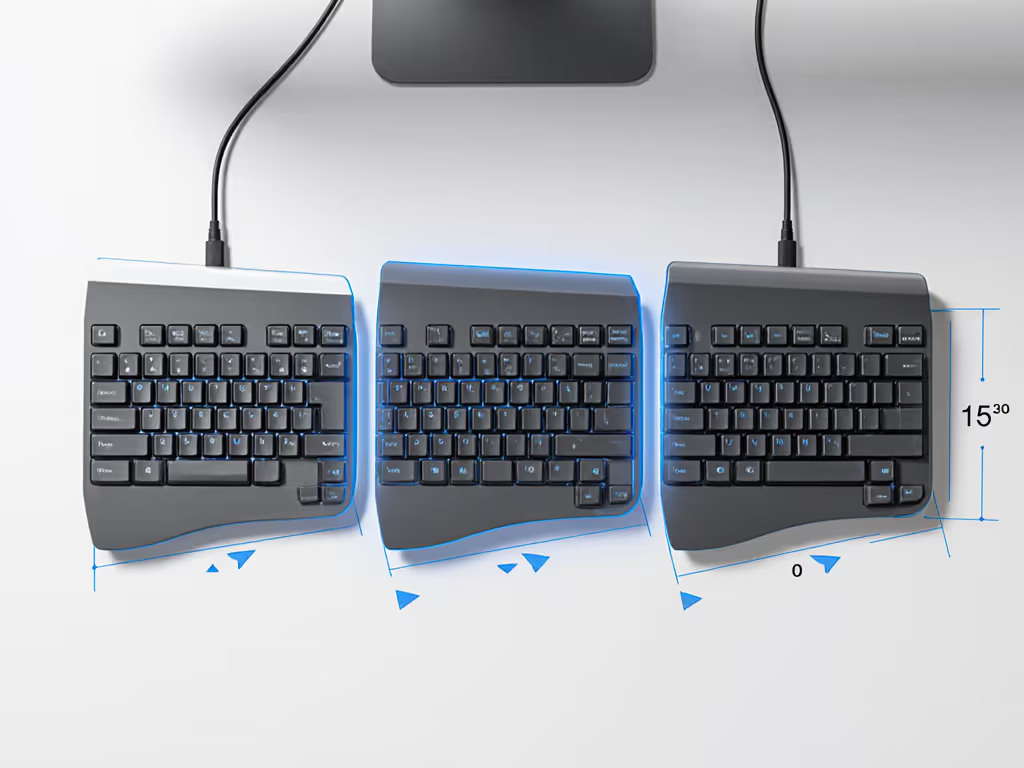
Wireless split keyboards commonly offer two adjustment dimensions: tenting (vertical separation of the halves) and tilt (angle relative to the desk surface).
Tenting angles typically range from 0° to 30°. This vertical incline reduces forearm pronation (the inward rotation that accumulates tension when you type on a flat surface for hours). Each degree of tenting shifts the load on your wrist and shoulder:
- 0° (flat): Requires maximum pronation; baseline for comparison but rarely ergonomically neutral for extended sessions.
- 10°: Mild relief; suitable for hybrid typists who code and write equally.
- 15 to 20°: Moderate relief; common recommendation for programmers and office workers.
- 25 to 30°: Significant pronation reduction; best for users reporting forearm or shoulder fatigue.
Tilt angle (forward or backward) affects wrist extension, how much your hand bends upward at the wrist joint. Neutral wrist extension is approximately 10 to 15° downward from a straight line along your forearm. Keyboards tilted backward (toward you) typically encourage this neutral position.
Defaults matter: most wireless boards ship flat or with minimal tilt. That default is a starting point, not a destination. For a broader primer on ergonomic mechanics and posture, see our complete ergonomic keyboard guide.
Step 3: Implement Adjustable Tenting
If your wireless keyboard includes adjustable feet or risers, test each preset systematically.
For split keyboards:
- Position each half independently with its own tenting angle.
- Start at 0° and type a 500-word email or code block. Record your subjective fatigue level (1–10 scale) at the 15-minute and 30-minute marks.
- Increase to the next preset (typically 5°, 10°, or 15° depending on your board) and repeat.
- Note which angle feels neutral, no wrist extension, no forearm pronation tension, shoulders relaxed.
Cross-platform note: Your ergonomic angle doesn't change between operating systems, but your keyboard's default layer or key mapping might. Test at each angle on all platforms you use (macOS, Windows, Linux) to ensure the physical comfort isn't undermined by modifier key confusion or unexpected function-row behavior.
Boards with adjustable thumb clusters add a third dimension: thumb angle. Test thumb cluster incline separately from the main body's tenting to avoid compounding variables.
Step 4: Validate Cross-Platform Consistency
Your wireless keyboard's angle is hardware; your operating system's keymap is software. Ergonomic relief fails if your macOS Option key maps incorrectly under Windows, or if your Linux terminal doesn't recognize a custom layer.
Once you've settled on an angle, test your keystroke consistency across devices:
- Open the same task on each OS (e.g., writing a commit message, editing a config file).
- Log your keypresses: If your keyboard supports QMK/VIA firmware, enable the keyboard logger to capture any missed or doubled presses at your chosen angle.
- Check modifier behavior: Press Ctrl, Cmd/Win, Shift, Alt, and function keys on each platform. Ensure no unexpected OS-level remapping interferes with your muscle memory.
- Record typing speed and error rate: Use an online typing test (e.g., TypeRacer, TypingMaster) at your finalized angle on each OS. Consistent speed across platforms suggests your angle supports neutral wrist position regardless of context.
If error rate spikes on one platform despite identical physical angle, the issue is likely an OS-level keymap conflict, not ergonomics, and should be addressed separately through your keyboard's remap tool or OS settings.
Step 5: Account for Wireless Stability Under Angle Changes
Splitting and tenting a wireless keyboard introduces physical separation between halves and can affect signal integrity in RF-dense environments (offices, apartments, co-working spaces). This is where reliability intersects ergonomics.
Test your wireless connection stability at your chosen angle:
- Position your keyboard at the angle you've selected (e.g., 15° tenting on both halves).
- Connect via Bluetooth or 2.4 GHz dongle depending on your board's capability. If you're deciding between radios, our Bluetooth vs 2.4GHz stability comparison shows real-world range, reconnection, and power trade-offs.
- Open a latency-sensitive task: a text editor with real-time character feedback, or a terminal with visible keystroke echo.
- Type continuously for 5 minutes while monitoring for dropped keys, lag spikes, or reconnection delays.
- Repeat in different environments: your home office, a cafe, an open office, and a conference room. For dense offices with lots of devices, use our RF congestion troubleshooting guide to maintain reliable connections. Signal interference varies by location; your angle shouldn't compromise wireless performance in any of these contexts.
If latency increases or key drops occur at a higher tenting angle (compared to your baseline flat angle), the culprit is likely antenna orientation or cable routing in your keyboard's case, not the ergonomic angle itself. Contact the manufacturer for clarification on whether the physical geometry affects signal path.
Step 6: Fine-Tune for Your Workload
Ergonomic optimization is workload-specific. A coder spending 8 hours daily on terminal work may tolerate different angles than a writer who alternates between typing and mouse use.
For coding and terminal work:
- Higher tenting angles (20 to 30°) can reduce forearm fatigue during sustained typing sessions.
- Pair with a split keyboard if possible to allow independent hand positioning.
- Test on real code (your actual project files) rather than generic typing tests; real work includes navigation, copy-paste, and modifier sequences that stress your wrist differently.
For gaming:
- Lower tenting angles (5 to 10°) or flat positioning preserve quick hand movements and precise keystroke timing.
- If your board includes adjustable geometry, test angle presets during actual gameplay to ensure the physical change doesn't introduce latency perception or finger confusion.
For travel:
- Ultra-compact or foldable wireless boards may lack tenting adjustment. If you need portability without sacrificing comfort, see our compact ergonomic keyboards tested for wireless reliability. Compensate with desk accessories: a laptop stand or monitor riser that elevates the keyboard's position, creating a pseudo-tented effect without physical adjustment.
- Confirm your angle choice is reproducible across multiple environments (hotel desk, coffee table, airport lounge) before committing to the setup.
For multi-OS switching:
- Your ergonomic angle remains constant, but layer behavior on each OS must be tested at that angle. A 15° tented angle on Windows + Linux should produce identical wrist and forearm stress; if it doesn't, investigate remapping or function-key inconsistencies before concluding the angle is problematic.
Measurement and Documentation
Record your findings in a simple spreadsheet:
| Angle | Fatigue (15 min) | Fatigue (30 min) | Wrist Extension | Pronation | Typing Speed | Error Rate | Wireless Latency |
|---|---|---|---|---|---|---|---|
| 0° | 4 | 6 | Extended | High | 72 WPM | 2.1% | Baseline |
| 10° | 3 | 4 | Neutral | Moderate | 74 WPM | 1.8% | Stable |
| 15° | 2 | 3 | Neutral | Low | 75 WPM | 1.6% | Stable |
| 20° | 2 | 4 | Slight Flexion | Very Low | 73 WPM | 1.9% | Slight lag |
This data is reproducible and cross-platform, your angle's impact on fatigue is measurable, not speculative.
Defaults matter: your keyboard's factory angle is a convenience, not a specification optimized for your body, workload, or environment.
Wireless Multi-Device Switching at Different Angles
If your wireless keyboard supports multiple device pairings (up to 4 to 5 devices via Bluetooth or 2.4 GHz dongle), test device-switching latency at your chosen angle. For model recommendations with rock-solid switching, check our multi-device keyboard roundup.
Some boards experience slower pairing or reconnection delays when halves are separated or tented. This is rare but worth validating:
- Pair your keyboard with all intended devices (work laptop, personal desktop, tablet, phone).
- At your finalized angle, switch between devices using the keyboard's device-selection button or key combo.
- Measure the time between device button press and first accepted keystroke (aim for under 500 ms).
- Repeat this test on each paired device to ensure consistent switching speed.
If a specific angle introduces lag during device switching, note it, and either adjust angle slightly upward to maintain signal integrity, or contact manufacturer support if the issue persists across multiple environmental contexts.
Conclusion: Further Exploration
Optimal keyboard tilt benefits extend beyond comfort to consistency across operating systems, workloads, and wireless environments. A systematic approach to angle selection (measuring baseline fatigue, testing presets, validating wireless stability, and documenting findings) removes guesswork and builds a reproducible setup that travels with you across machines.
From here, explore these complementary adjustments:
- Layer mapping: Optimize your macOS, Windows, and Linux key bindings at your chosen angle to ensure modifier behavior feels natural and consistent across contexts.
- Wrist support: Test whether external wrist rests or arm positioning changes improve fatigue scores at your finalized angle, ergonomics is layered.
- Desk height and monitor position: Your keyboard's angle is one variable; monitor height, chair depth, and desk angle complete the picture. Re-measure fatigue after adjusting the full workstation.
- Wireless environment testing: If you work in multiple locations (office, home, cafe), validate your angle and device-switching reliability at each site before committing to the setup long-term.
- Firmware and layer customization: Investigate whether your keyboard's firmware (QMK, proprietary, or Via-compatible) supports angle-aware macros or layer switching, letting you save angle-specific configurations per device or OS.
Your wireless keyboard should disappear into your workflow. The right angle is the angle that makes you forget about the keyboard entirely.
Related Articles